Thursday, 11 April 2013

Oatmeal Cream Pies

I had never had a Little Debbie Oatmeal Creme Pie until about a year ago.
My boyfriend bought a box and I have to say they were so addictive I think we ate the whole box in less then 24 hours. Thinking about that makes me feel ill. When you are in it though, and those cream pies are sitting on the table calling your name, it's hard to resist.
I decided I would make Oatmeal Cream Pies for him and they are all over the baking blog world.
I ended up using the recipe from sallysbakingaddiction because it was easy and I didn't need to use gelatin and I had the ingredients. I love oatmeal cookies so I knew that whatever happened they would be wonderful. Tt was just a question of how close they would be to the original Little Debbie Oatmeal Creme Pies and how much my boyfriend would like them.


Homemade Oatmeal Cream Pies

Cookies
1 & 1/4 cup margarine
1 cup brown sugar
1/2 cup sugar
1 egg
2 tsp vanilla
1 tbsp cooking molasses
1 & 1/2 cups AP flour
1 tsp baking soda
1/2 tsp salt
3/4 tsp cinnamon
1/4 tsp ground cloves
3 cups quick oats


Preheat oven to 375 degrees F.
cream together butter and sugars until smooth
add egg, vanilla, molasses and continue to blend together.
in another bowl add in all the dry ingredients and lightly mix.
slowly add the dry ingredients into the other ingredients and continue to mix. You may have to end up mixing with a wooden spoon as the mixture will be thick.
scoop out round amounts about 2-3 tbsp in size and place on cookie sheets. (I made some larger ones and some smaller only 1 tbsp in size)
the cookies will spread out so leave enough room between each cookie.
bake for about 10 minutes until cookies are golden on the edges.
allow to cool on the cookie sheets for a couple minutes then allow to cool completely on wire racks.


Once cookies are completely cool make the cream filling:
3/4 cup margarine
3 cups powdered sugar
3 tbsp whipping cream
1 & 1/2 tsp vanilla
pinch of salt

beat butter until creamy. add the sugar and mix together. pour in the cream and vanilla and beat until fluffy. add a pinch of salt or more if desired. Add more sugar or cream depending on how thick or thin you would like the filling to be. Spread filling on bottom of one cookie and sandwich with another.

These cookies were really good. I enjoyed them alot and so did my boyfriend.
However, hey are not like Little Debbie's, I'm not sure if it would even be possible to mimic the texture and flavour of those little plastic wrapped creme pies. bravetart says her recipe is the closest to them, so I'm going to have to try them out sometime!
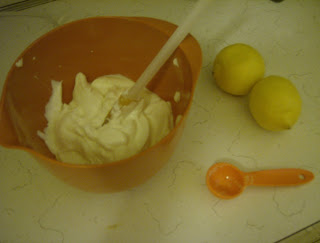
I still have Cream Filling let over though, I wonder what I should put that filling on or in...hmm..


Tuesday, 9 April 2013

for love of peanut butter!

I LOVE PEANUT BUTTER! I. Love. It!
have I ever told you that? I really do.
If you asked my boyfriend he would tell you I feel this strong love for other things as well, he probably has a list so he can make fun of me about it, but it's true I really love peanut butter.

A while ago I wanted to make my own peanut butter because how hard could it be all you really need is peanuts. I looked at different websites to see if you had to put oil in too or not and just peoples different take of making it. I came across Averie Cooks because she makes her own peanut butter and in lots of variations. She also has a cookbook focused on all peanut butter snacks. I made my own peanut butter and it's delicious and I plan to make my own variations which for some reason I had never thought of until looking at what Averie had made.

This week I wanted to make something fast and easy. However, I wanted it to be super good obviously. I don't remember why I decided on Peanut butter and Jam. Probably because I LOVE PEANUT BUTTER! There are so many great recipes out there but I decided to go with one from Averie Cooks because she seems to be the peanut butter connoisseur.

I'd like to tell you now that if you love peanut butter as much as I do, and if you love peanut butter and jam. If you love grilled peanut butter and jam sandwiches (which were introduced to me by my sister-in-law as she use to make them for herself when she was vegan and couldn't have grilled cheese). If you love ooey, gooey desserts with a sweet and salty combination. This recipe is not for you. It really, really is not for you. I'll tell you why... because you will eat the whole tray. You will eat the dough, you will eat the topping. and you will eat it as soon as it comes out of the oven and burn your mouth on it. So I'm telling you now. Just stay away.

These are to die for.


Peanut butter and Jam Blondies
recipe from averie cooks

1/2 cup butter melted
1/4 cup peanut butter melted
1 cup brown sugar
1 egg
2 tsps vanilla
1 1/4 cup AP flour
1/4 tsp salt
1/4 - 1/3 cup peanut butter in tbsps
1/4 - 1/3 cup jam/jelly in tbsps


Preheat the oven to 350 degrees. Line a square baking pan with foil.
heat the butter until melted then add in the peanut butter. stir until all melted and smooth. you may need to heat the mixture again to melt the peanut butter completely.
add the sugar, stir in to mixture.
add in the egg and vanilla, stir to incorporate.
add the salt and flour. Mix until combined. Do not over mix.
pour the batter into the prepared pan.
(i used a electric mixture however it was not necessary)


Now scoop tbsp size amounts of peanut butter and jam onto the batter.
then swirl together.


now you are ready to put your creation in the oven. Bake for 20-25 minutes.
you are not going to want to over bake these so keep and eye on them.
You want them to be an ooegy, gooey mess. trust me.
let them cool before taking the out of the pan and slicing so the peanut butter has time to set.
I do not recommend eating them right out of the pan as you will burn your mouth.
but boy was it worth it.
voila.


Tuesday, 2 April 2013

Lemon Cheesecake

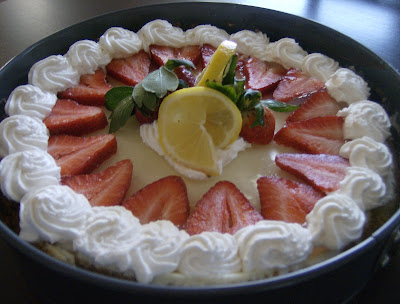
Since I'm a grown up now and live on my own, when I attend family gatherings I have to contribute to the feast. I guess "have to" might be too strong. I like to contribute. Being in love with baking naturally I wanted to bring dessert. I decided on making a strawberry milk cheesecake featured on sprinklebakes. However once I fell in love with this cake, and obtained all the ingredients except one, which was strawberry milk powder I hit a little bit of a problem. Canada does not have strawberry milk powder, or at least not where I live. I went to a number of stores and my mother being the great women she is helped me look as well with no success. I even looked on ebay! The dilemma was then what should I make instead? Cheesecake naturally because I had the ingredients, but what kind? Lemon and Strawberries was all I could think about, both remind me of spring flavours and it just so happened that strawberries were on sale this week, bonus! I then had to decided what lemon cheesecake recipe to use. After I looked at so many recipes, and had to avoid all recipes that contain gelatin as my brother and his fiance are vegetarians I decided on one from creative-culinary. It seemed easy enough, which is what I needed as I had never made a cheesecake before. I did however look at multiple other sites to tell me how to know when it was done. To be honest right until I cut into this cake I was still unsure of whether or not I cooked it enough, or too much or how this cheesecake turned out. It seemed alright but having no cheese
cake experience except for eating it I had nothing to go on except what I read, my faith in my trusty old gas oven, and my baking spirits. And I must say the cheesecake gods must have been looking down on me because this was lemon bliss.


Lemon Cheesecake
recipe from creative-culinary

Crust:
2 1/4 cups graham cracker crumbs
1/4 cup granulated sugar
6 tbsp melted butter

preheat oven to 350 degrees F.
mix together crumbs, sugar and butter. once combined press into a large spring form pan. on the bottom and sides. (I used a 10 inch, the original recipe calls for 11-12 inch.)  
bake crust for 5 minutes and allow to cool.

Filling:
3 - 8 oz packages of cream cheese, softened
3 eggs
1 1/3 cup granulated sugar
3 tbsp lemon juice (fresh squeezed prefered)
2 tsp vanilla extract
1 tsp lemon zest

beat cream cheese until smooth.
add in eggs one at a time, beat until smooth each time.
add the sugar, vanilla and lemon juice. beat until smooth and combined.
stir in lemon zest.
pour into cooled crust.
baked in heated 350 degree F oven for about 45 mins. (since I used a smaller pan I had to bake it longer original recipe says bake time 35 mins.) 


Sour Cream Topping:
2 cups sour cream
3 tbsp granulated sugar

mix sour cream and sugar together.
once baked remove from oven.
spread sour cream topping on cheese cake and return to oven.
bake for another 15 mins. 

remove from oven and allow to cool on rack for 30 minutes.
place in refrigerator and allow to cool.
prepare lemon glaze.

Lemon Glaze:
1/2 cup granulated sugar
1 tbsp plus 1 tsp cornstarch
1/2 cup water 
2 tbsp lemon juice

in sauce pan combine sugar and cornstarch.
place on medium heat and stir in water and lemon juice.
bring to boil, stir constantly and until mixture is thickened.
take off heat and allow to cool.
once cool pour onto cheese cake and refrigerator cake overnight.

Top with whipped cream and strawberries, or whatever you've like.